Create Quick Invoice
Important: You can create your required Master data directly from these menu, provided you have the necessary permissions to create new master data like Customer Master, Credit Terms, Product Code, UOM and Taxes. Now you can create Quick Invoices to send the Invoices quickly to customers.
Create Quick Invoice for your business that helps to run and grow the business. Now you can create any invoices in less than 4 min and email to a professional Invoice copy to your Customer.
Important to note is This invoice doesn’t create any transactions (Inventory and Financial) and will not affect Inventory. It is a good tool when you want to send a professional looking Invoice that’s created and sent to customer.
The advantage of this invoice is, you do not need to make any master data and can begin use it.

Create a new Quick Invoice – Process to follow as below.
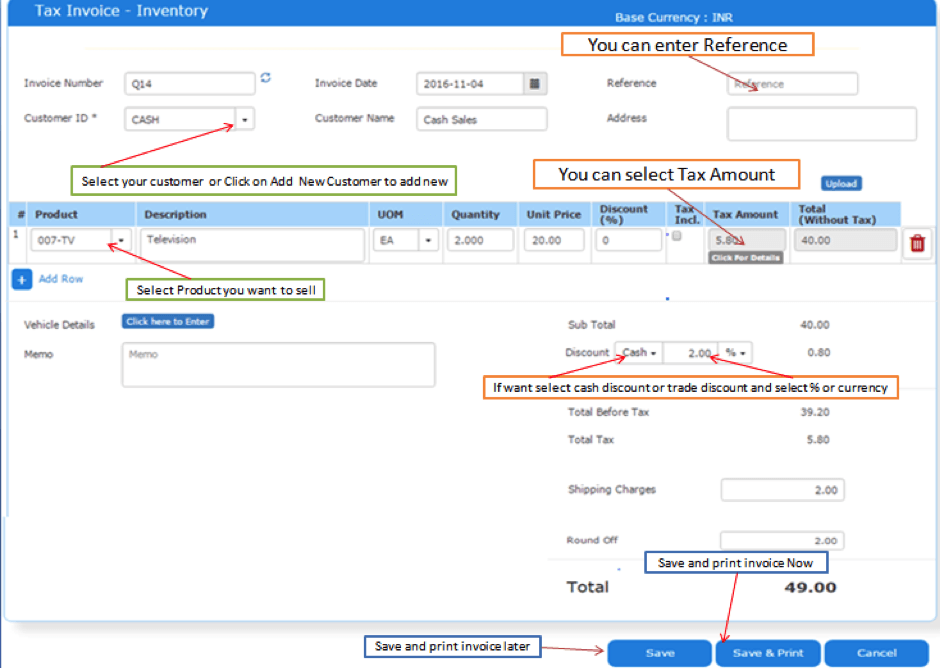
Step 1: Go to the Quick Invoice > Quick Invoice and click on Create New in this section.Invoice Number will be populated automatically
Step 2: Select a Customer ID from the Drop-down. All his details like Customer name, Credit Terms These data will be populating based on the data entered in the Customer Master, else can be selected from the drop-down.
Step 3: Select or search an item drop down, based on selection its UOM, Price and Taxes would be populated. You can modify the same, if required. Enter Quantity and Unit Price. The Unit Price will be populated if it is defined in Product Master, else enter the Unit Price.
Click on to add a new row and to delete the row. You can add any number of items desired.
Step 4: Click on “Tax Details” to get more details on Type of taxes applied and its Amounts. Select the Tax by click on the checkbox.
Application will calculate the Gross Amount, Tax Amount and Net Amount. These fields are non-modifiable and are populated automatically. Enter the Shipping Address, Mode of Shipping if any.
Step 5: Click on Save, a new Quick invoice is created with a Invoice number. The inventory will not reduce and transaction will not be posted. The reason is, we do not connect Inventory and Accounting here.
Step 6: Click on “Cancel” will clear the Screen contents and will take you back to Quick Invoice Dashboard.
Click here to Download the Free Invoice Format in Excel
|

